Introduction
Most mobile applications require network connection. Unfortunately, analysing calls is not so easy. Ask most developers how to do and we will get such answers:
- A call is failing, and we do not know why? Let’s debug the application and put a breakpoint before the call.
- We need the duration how the call. Let’s put a stopwatch around the call and print the result in a console.
- We need to simulate an error to see how the application is behaving. Let’s modify the code and throw an exception somewhere.
- We need to mock some data because an api is down? Let’s modify the code and create our own object instead of calling the api.
As we can see, most answers involve a modification of the code. This is far from being the most convenient or efficient approach. Hopefully there is a better way.
Whether you are using Xamarin or not, as long as it is on iOS or Android, what is described in this post will work.
Using debugging proxies
Web debugging proxies allow developers to analyse network calls coming out from any application.
The most well known debugging proxies on the market are:
- Telerik Fiddler, which was Windows specific for a long time and has an experimental version in MacOS and Linux.
- Charles Proxy, which works on MacOS, Linux and Windows.
In this article we will use Charles Proxy.
Configuring the mobile
Define mobile proxy
Once Charles Proxy is installed and launched, we need to get our local ip.
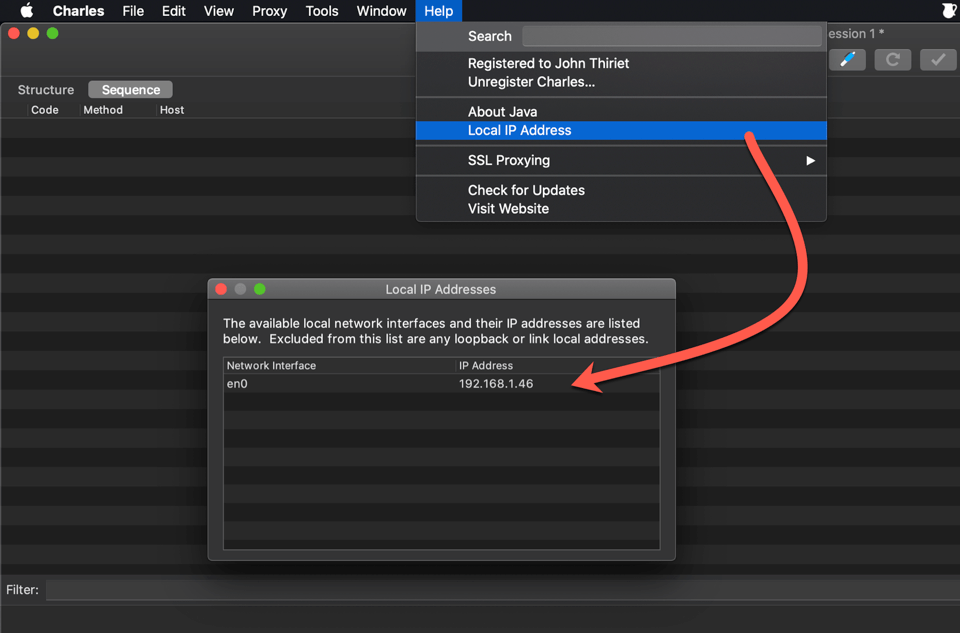
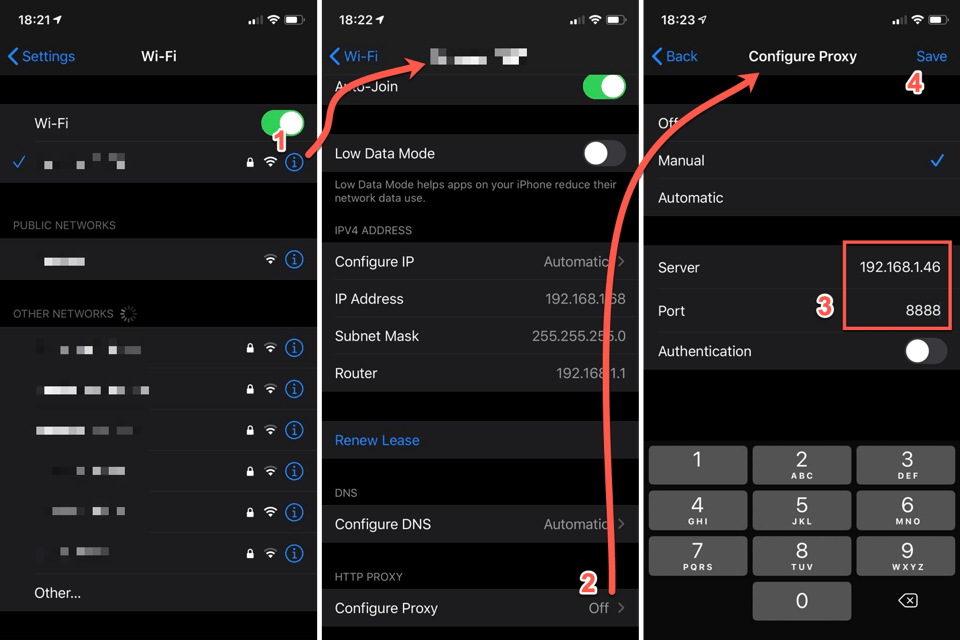
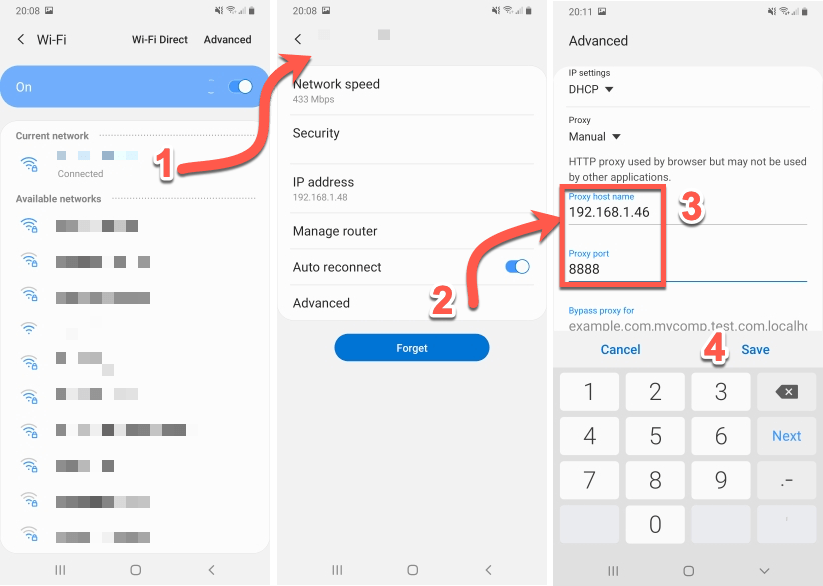
This is the IP we will need to set as a proxy in the phones network parameters.
Obviously, for this to work correctly, the phone needs to be on the same network than the computer with Charles Proxy.
Setting the IP address differs from phone to phone but let see to examples.
iOS device
Android device
Decrypt SSL
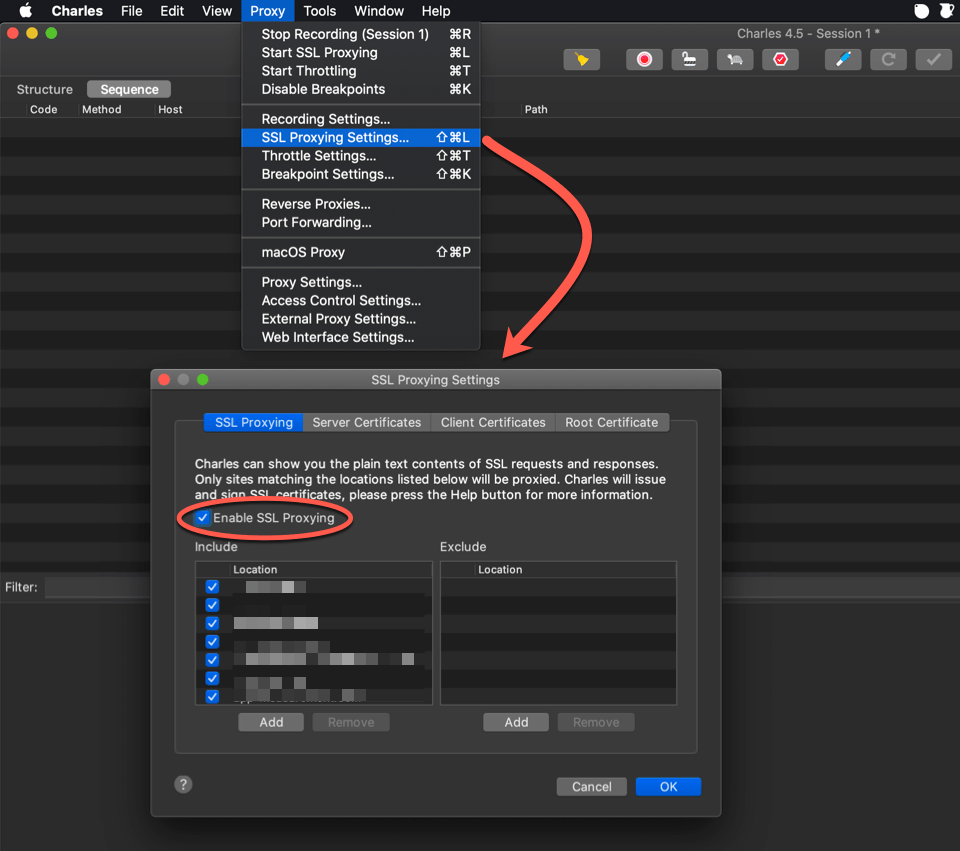
In order to decrypt SSL traffic, we need to activate Charles’s SSL proxying.
Charles SSL proxying
In Charles Proxy:
- Go to
Proxy. - Select
SSL Proxying Settings. - Enable the
Enable SSL Proxyingoption.
Do not forget to include domains you want to decrypt the traffic for.
Install SSL certificate
Finally we need to install Charles’s custom SSL certificate in the mobile device.
iOS device
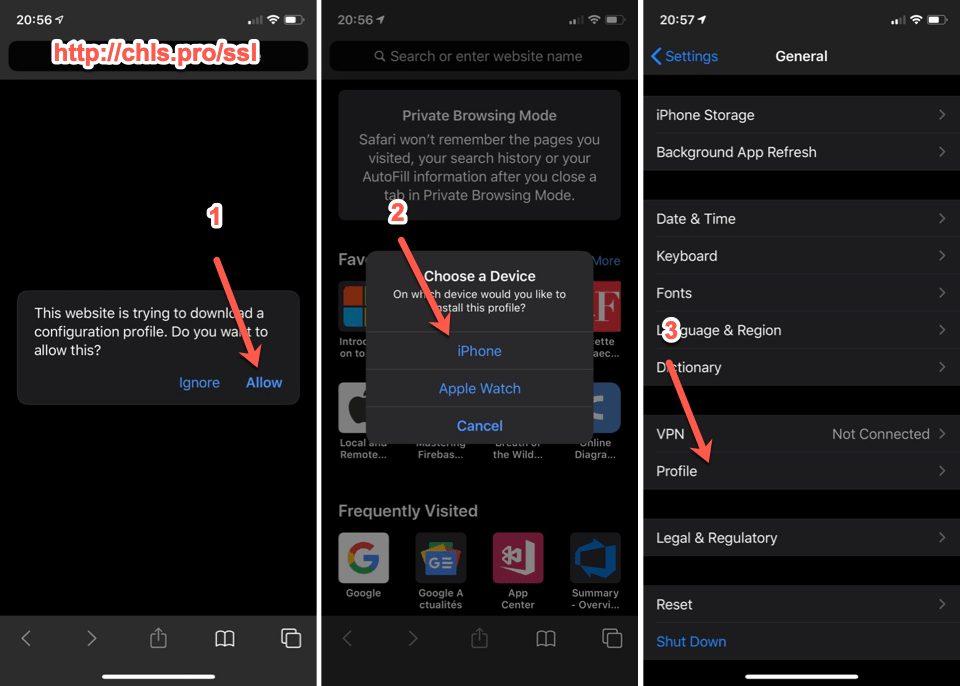
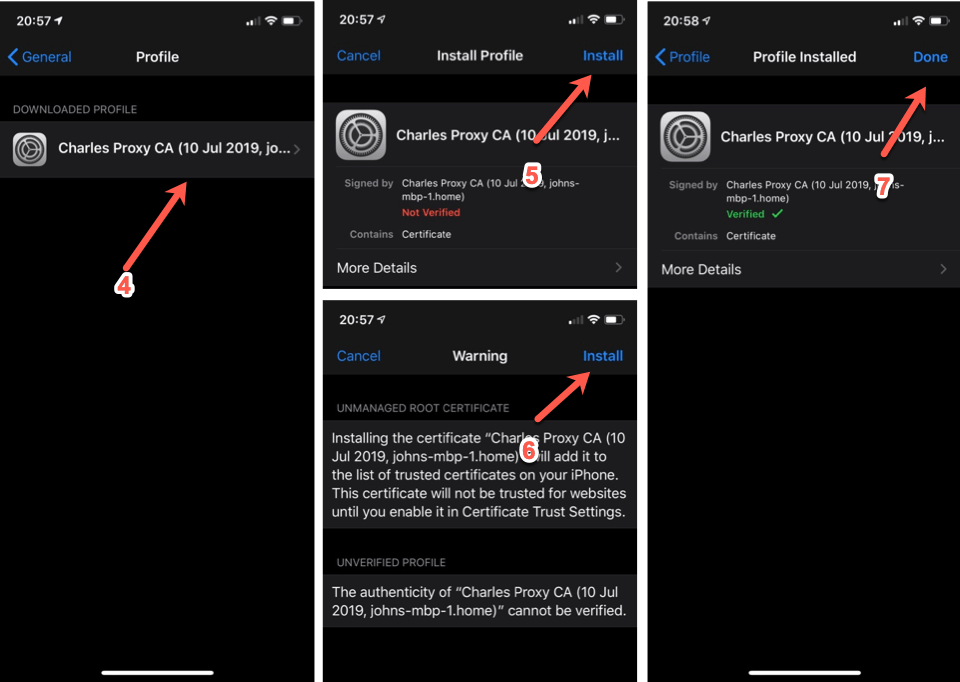
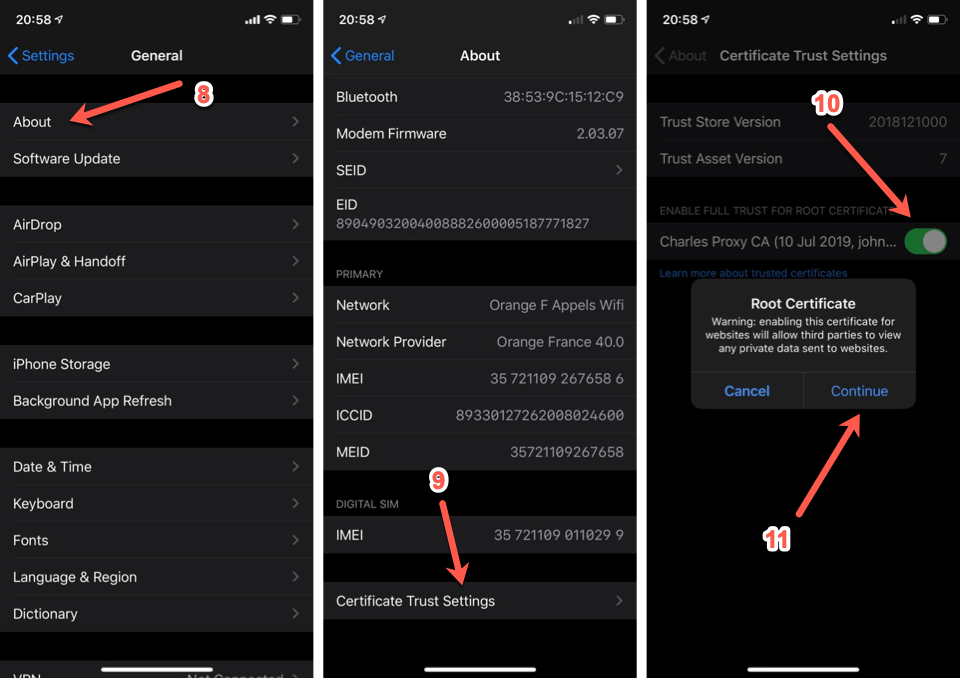
Trusting a certificate in iOS requires a lot of different steps. Please follow the steps carefully as in the screenshots below.
- Go to http://chls.pro/ssl and allow the downloaded file to be installed.
- If you are prompted with a device, select your phone.
- In the phone settings, under
Generalselect theProfileitem. - Select Charles Proxy certificate.
- Tap on the
installmenu item. - On the next screen tap
installonce again. - Profile is now installed, tap
done. - In the phone settings, under
Generalselect theAboutitem. - Tap on the
Certificate Trust Settingselement. - Switch on the toggle corresponding to the certificate.
- Tap on
Continueto confirm.
Android device
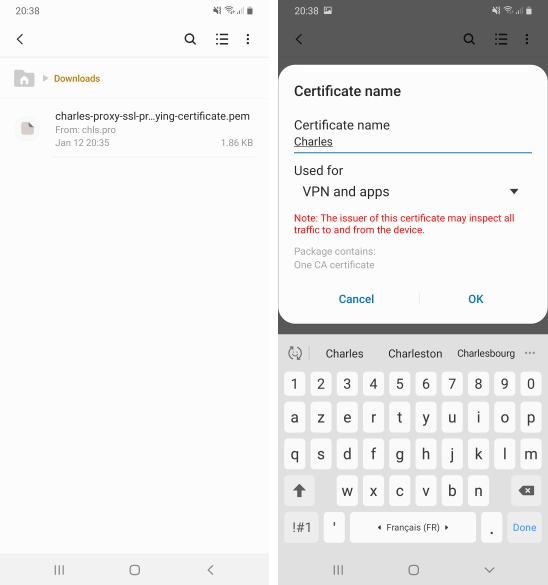
- On your browser, go to
http://chsl.pro/ssland download the certificate. It will download the certificate in your downloads folder. - In the downloads folders, look for the certificate (the name should be
charles-proxy-ssl-proxying-certificate.pem) and tap on it. - Give it a name, check that it is installed for
VPN and apps.
On most devices this should be enough, but some might require more steps so please check at your device specificities before continuing.
Android application
Since Android 8, an additional step is required at the application level to allow the whole process.
- Create a new xml file under
resources/values/xml. - Name it
network_security_config.xml. - Paste the following xml content inside the newly created file.
- Reference this file in your manifest at the application level with the
android:networkSecurityConfigproperty.
You should have a process to remove network_security_config at build time for production builds to prevent anyone from analysing your application.
<?xml version="1.0" encoding="utf-8"?>
<network-security-config>
    <!-- You should remove this for store builds -->
     <base-config>
        <trust-anchors>
            <certificates src="system" />
            <certificates src="user" />
        </trust-anchors>
   </base-config>
    <debug-overrides>
        <trust-anchors>
            <!-- Trust user added CAs while debuggable only -->
            <certificates src="user" />
            <!-- Trust preinstalled CAs -->
            <certificates src="system" />
        </trust-anchors>
    </debug-overrides>
</network-security-config>
<application android:networkSecurityConfig="@xml/network_security_config" ...>
...
</application>
Better safe than sorry. You really need to remove network_security_config for production builds !
Xamarin application
If you are using Xamarin to create your application, make sure that HttpClient uses native http handlers or the device’s proxy configuration will be ignored:
- AndroidClientHandler for Android
- NSUrlSession for iOS
Run
Now that Charles Proxy and the phones are set up, tracing works correctly. On the top you should see network calls made. Selecting a call lets you explore headers, parameters, requests and responses.
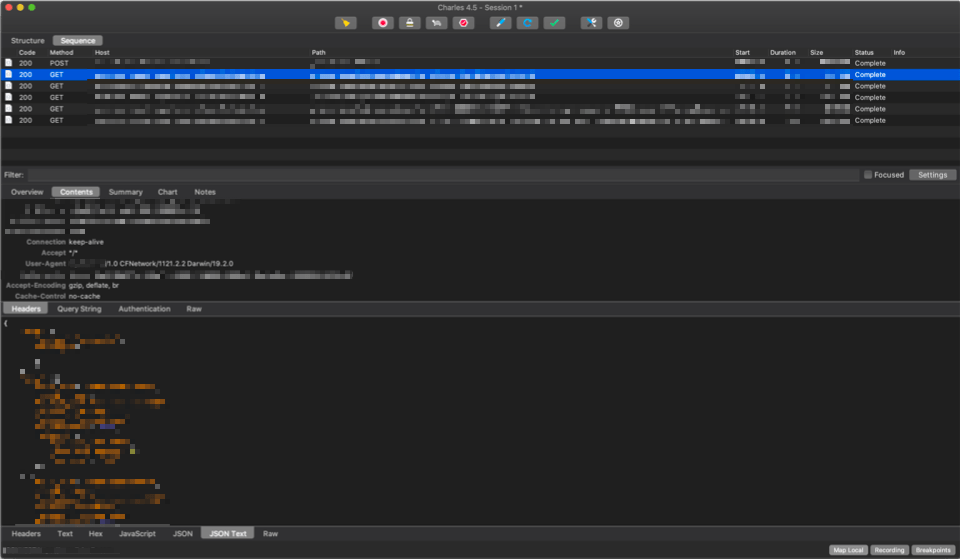
It is possible to do more, but this will be for another time!
As always, please feel free to read my previous posts and to comment below, I will be more than happy to answer.


Comments