
Warning : This page has been marked as an archive because the author consider that its content is no longer relevant.
In this post, I will extend the push temperature project to add a netTcpBinding endpoint to the wcf service and use it in Silverlight.
Configuring the web server
This is probably the most annoying part of this article, but be sure to make no mistakes here or you’ll have some surprises. I had some myself. Note that you need to run IIS to use the WCF NetTcp binding as the baked Visual Studio Web Server doesn’t support it.
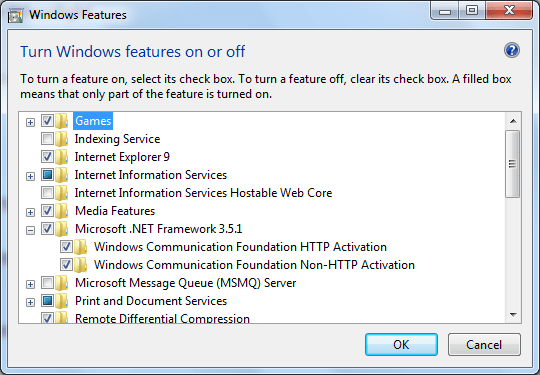
1 – Add Non-HTTP WCF Activation
First add the windows feature as in the following screenshot :
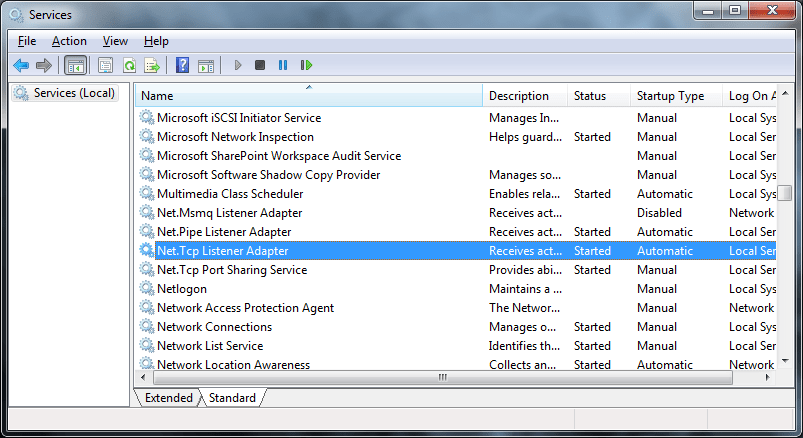
After the installation is complete check that the Net.Tcp Listener Adapter is started :
2 – Host the website in IIS
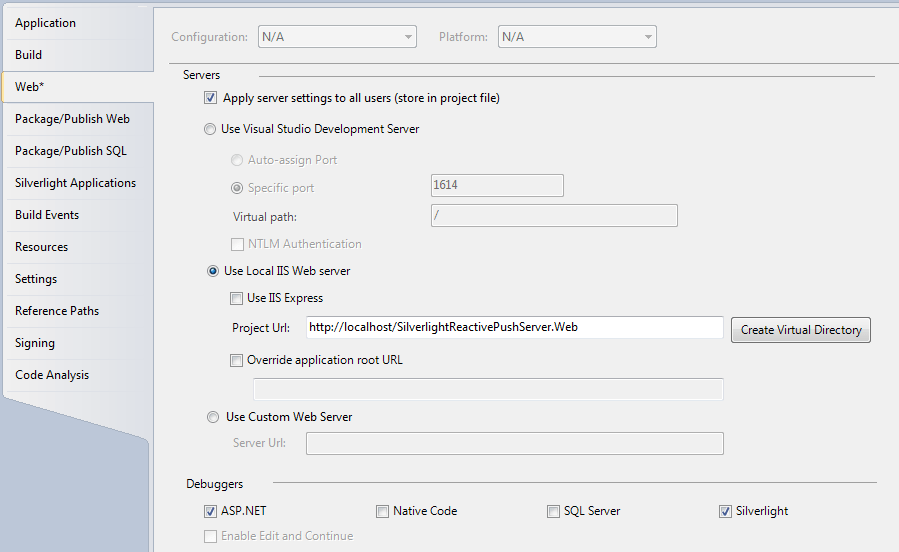
First, you need to run Visual Studio as administrator in order to let him modify your local IIS instance. For this article I use the exact same project as the previous article. In the properties of the web project I instruct Visual Studio that I want to deploy on the local IIS server (don’t forget to press the Create Virtual Directory button).
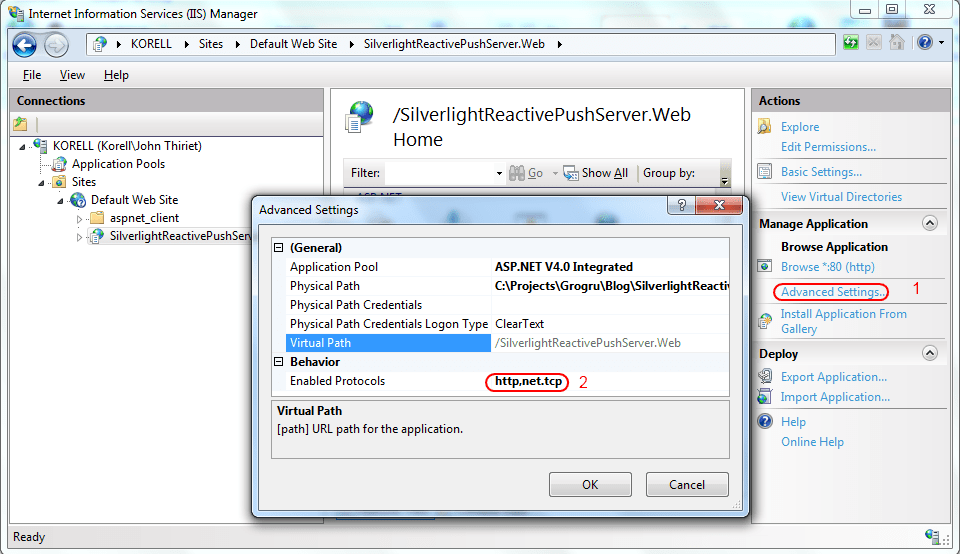
3 – Configure bindings and protocols
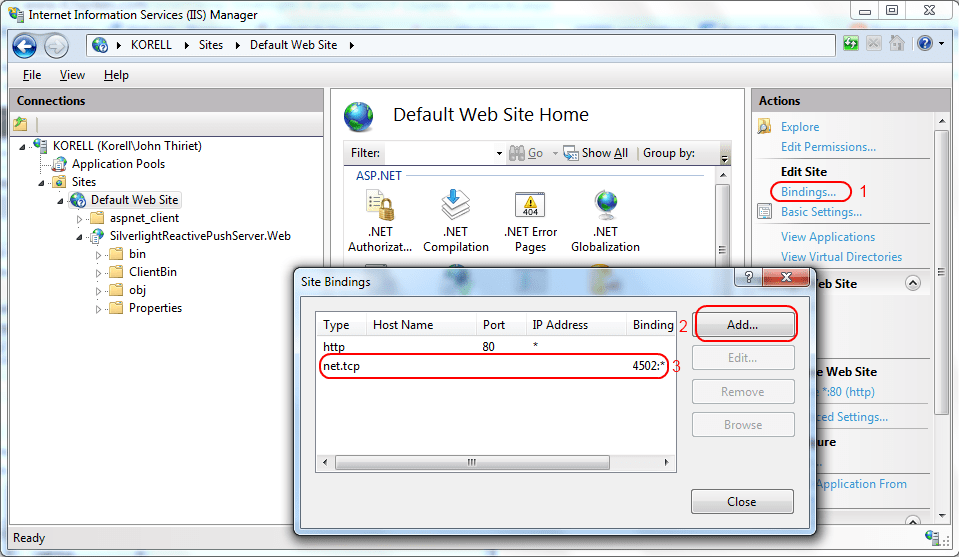
Open the IIS Manager and look for the website hosting your web application (usually Default Web Site). Add the net.tcp binding on the port 4502. This is the port we will use in our Silverlight application (Silverlight untrusted in-browser applications are limited to ports 4502 to 4534).
You also need to add NetTcp to the list of the enabled protocols for your web application. For this selected your web application and in the advanced properties, add the net.tcp protocol as in the following screenshot :
The final step in the configuration consists in setting up IIS with .NET 4. In order to do this, open a Visual Studio Command Prompt as an administrator and run the following command line :
aspnet_regiis.exe –iru
Configuring the WCF Services
Now that IIS is configured correctly, we need to configure the WCF services. I’ll just copy my configuration file that allows both netTcp and pollingDuplex at the same time. Note that korell is my machine’s name and you’ll need to put yours instead of course.
<?xml version="1.0" encoding="UTF-8"?>
<configuration>
    <system.web>
        <compilation debug="true" targetFramework="4.0" />
    </system.web>

    <system.serviceModel>
      <extensions>
        <bindingExtensions>
          <add name="pollingDuplexHttpBinding" type="System.ServiceModel.Configuration.PollingDuplexHttpBindingCollectionElement, System.ServiceModel.PollingDuplex, Version=4.0.0.0, Culture=neutral, PublicKeyToken=31bf3856ad364e35" />
        </bindingExtensions>
      </extensions>
      <bindings>
        <pollingDuplexHttpBinding>
          <binding name="multipleMessagesPerPollPollingDuplexHttpBinding" duplexMode="MultipleMessagesPerPoll" maxOutputDelay="00:00:00.500" sendTimeout="00:00:02.000" closeTimeout="00:00:02.000" />
        </pollingDuplexHttpBinding>

        <netTcpBinding>
          <binding name="netTcpBindingConfig">
            <security mode="None" />
          </binding>
        </netTcpBinding>

      </bindings>
      <services>
        <service name="SilverlightReactivePushServer.Web.TemperatureService">
          <endpoint address="wsDualHttp" binding="wsDualHttpBinding" contract="SilverlightReactivePushServer.Web.ITemperatureService" />
          <endpoint address="polling" binding="pollingDuplexHttpBinding" bindingConfiguration="multipleMessagesPerPollPollingDuplexHttpBinding" name="pollingDuplex" contract="SilverlightReactivePushServer.Web.ITemperatureService" />
          <endpoint address="netTcp" binding="netTcpBinding" bindingConfiguration="netTcpBindingConfig" contract="SilverlightReactivePushServer.Web.ITemperatureService" />
          <endpoint address="mex" binding="mexHttpBinding" name="mex" contract="IMetadataExchange" />
          <host>
          <baseAddresses>
            <add baseAddress="net.tcp://korell:4502/SilverlightReactivePushServer.Web/TemperatureService.svc" />
            <add baseAddress="http://korell/SilverlightReactivePushServer.Web/TemperatureService.svc" />
          </baseAddresses>
          </host>
        </service>
      </services>
        <behaviors>
            <serviceBehaviors>
                <behavior name="">
                  <serviceMetadata httpGetEnabled="true" />
                    <serviceDebug includeExceptionDetailInFaults="true" />
                </behavior>
            </serviceBehaviors>
        </behaviors>

      <serviceHostingEnvironment multipleSiteBindingsEnabled="false" aspNetCompatibilityEnabled="true" />
    </system.serviceModel>
</configuration>
We also need to add the following clientaccesspolicy file at the root of the website (here it’s Default Web Site) :
<?xml version="1.0" encoding="utf-8"?>
<access-policy>
  <cross-domain-access>
    <policy>
      <allow-from http-request-headers="*">
        <domain uri="*" />
      </allow-from>
      <grant-to>
        <resource path="/" include-subpaths="true" />
        <socket-resource port="4502-4530" protocol="tcp" />
      </grant-to>
    </policy>
  </cross-domain-access>
</access-policy>
Note that this file is really permissive and should be used in developement environments only.
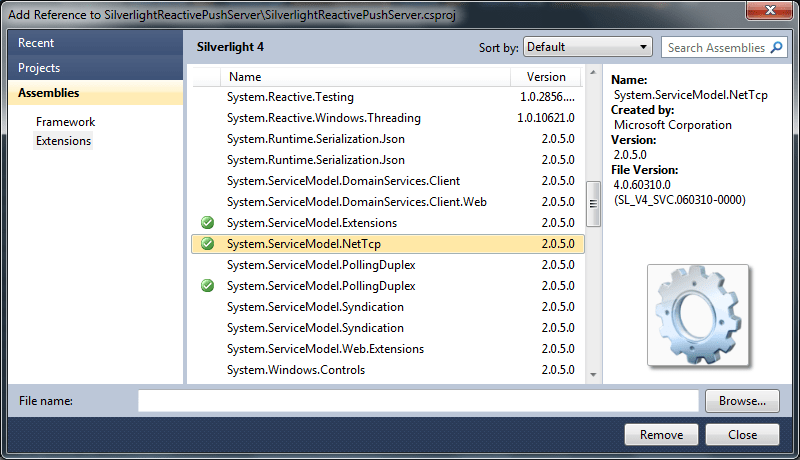
Modifying the Silverlight client
In the Silverlight client we first need to add a reference to System.ServiceModel.NetTcp as in the following screenshot :
After this we need to modify the ServiceClient.config file to add the netTcp endpoint :
<configuration>
  <system.serviceModel>
    <bindings>
      <customBinding>
        <binding name="httpPolling">
          <binaryMessageEncoding />
          <pollingDuplex duplexMode="MultipleMessagesPerPoll" />
          <httpTransport transferMode="StreamedResponse" maxReceivedMessageSize="2147483647" maxBufferSize="2147483647" />
        </binding>
        <binding name="NetTcpBinding_ITemperatureService">
          <binaryMessageEncoding />
          <tcpTransport maxReceivedMessageSize="2147483647" maxBufferSize="2147483647" />
        </binding>
      </customBinding>
    </bindings>
    <client>
      <endpoint address="http://korell/SilverlightReactivePushServer.Web/TemperatureService.svc/polling"
                binding="customBinding"
                bindingConfiguration="httpPolling"
                contract="TemperatureServer.ITemperatureService"
                name="HttpPollingDuplexBinding_ITemperatureService"/>
      <endpoint address="net.tcp://korell:4502/SilverlightReactivePushServer.Web/TemperatureService.svc/netTcp"
          binding="customBinding" bindingConfiguration="NetTcpBinding_ITemperatureService"
          contract="TemperatureServer.ITemperatureService" name="NetTcpBinding_ITemperatureService" />
    </client>
  </system.serviceModel>
</configuration>
You’ll notice that we now have two bindings :
- NetTcpBinding_ITemperatureService
- HttpPollingDuplexBinding_ITemperatureService
We can choose which one will be used in the constructor of the service client’s instance :
_client = new TemperatureServiceClient("HttpPollingDuplexBinding_ITemperatureService");
// OR
_client = new TemperatureServiceClient("NetTcpBinding_ITemperatureService");
And that’s pretty much it. The proxy class used for each binding is the same so there’s no need to change anything else. Just choose your binding and run with it. I’ve created a sample project that can change its binding at runtime. I have no other way to prove it work than telling you to analyse your network traffic using a tool like Microsoft Network Monitor. You can find the source code of this sample on my skydrive as always.
Hope you’ll like it.
Comments