
I love async await !
In my opinion, the last time we got something as powerful as this was Linq. Of course, without Tasks it would not be as interesting as it is today.
If you have never heard of it, async await is basically a syntaxic sugar on steroids and can refer to Microsoft’s documentation to learn more about it (link at the end of this post).
A glance at the past
Before it was available, on platforms such as Windows Phone or Windows RT, asynchronous programming was done the old way :
public class MyService
{
    public void Process()
    {
        // Do something in another thread then call the ProcessCompleted event
    }

    public event EventHandler ProcessCompleted;
}

public class MyViewModel
{
    private readonly MyService _myService;

    public MyViewModel()
    {
        _myService = new MyService();
        _myService.ProcessCompleted += OnMyServiceProcessCompleted;
    }

    public void ExecuteProcess()
    {
        // Call me from a button click
        _myService.Process();
    }

    public void OnMyServiceProcessCompleted(object sender, EventArgs args)
    {
        // Do some UI stuff
    }
}
The problem with this approach is that most of the time the completion method would be invoked in a background thread.
Because of the thread affinity of UI objects, trying to deal with them in a background thread results in crashes.
To get back to the UI thread, here is what we would write on Xaml platforms :
public void OnMyServiceProcessCompleted(object sender, EventArgs args)
{
    Dispatcher.BeginInvoke(() =>
    {
        // Do some UI stuff
    });
}
The human brain is better at reading sequences of actions. Here we have multiple pieces of code executing in a flow that is hard to follow. We need spend to a long time understanding perfectly what happens in this code and when.
Await for the win !
Using the await pattern the previous code is refactored like this :
public class MyService
{
    public async Task Process()
    {
        // Start a new Task that runs in another thread
    }
}

public class MyViewModel
{
    private readonly MyService _myService;

    public MyViewModel()
    {
        _myService = new MyService();
    }

    public async void ExecuteProcess()
    {
        try
        {
            // Call me from a button click
            await _myService.Process();
            // Do some UI stuff
        }
        catch (Exception ex)
        {
            // Deal with errors
        }
    }
}
After the task completes, we are on the main thread.
Synchronization context
The magic of all this lies within the SynchronizationContext class.
As stated by Lucian Wischik in the 6th video of his series about asynchronous programming (link at the end of this post), the synchronization context represents a “target for work”.
In the case of a WPF application, it’s Post method does a Dispatcher.BeginInvoke. In the case of a Xamarin application, it will use the native method to go back to the main thread.
This is why in our previous sample, we can modify the UI after awaiting the task.
Basic code
If we think a second about it, it means that everytime we await, we go back to the captured contexted after the execution of the awaited task.
Therefore, the following code should be pretty inefficient :
/// <summary>
/// Run a long running task composed of small awaited tasks
/// </summary>
private async Task<int> ProcessAsync(int loop)
{
    int result = 0;
    for (int i = 0; i < loop; i++)
    {
        // Can deal with UI stuff here
        await Task.Delay(10);
        // Can deal with UI stuff here
        result += i;
    }

    return result;
}
To check the current synchronization context we can add some logs :
private async Task<int> ProcessAsync(int loop)
{
    int result = 0;
    for (int i = 0; i < loop; i++)
    {
        Debug.WriteLine(SynchronizationContext.Current == null);
        await Task.Delay(10);
        Debug.WriteLine(SynchronizationContext.Current == null);

        result += i;
    }

    return result;
}
In the output console, “True” will be printed since the synchronization context is kept.
Configure await
Though pretty convenient, the previous code in somewhat inefficient in our scenario. We do not actually care whether we are on the main thread or not. So why not stay in the background to free the UI thread ?
This is what the ConfigureAwait method enables to do.
/// <summary>
/// Run a long running task composed of small awaited and configured tasks
/// </summary>
private async Task<int> ProcessConfiguredAsync(int loop)
{
    int result = 0;
    for (int i = 0; i < loop; i++)
    {
        Debug.WriteLine(SynchronizationContext.Current == null);
        await Task.Delay(10).ConfigureAwait(false);
        Debug.WriteLine(SynchronizationContext.Current == null);

        result += i;
    }

    return result;
}
Calling ConfigureAwait(false) after the task means that we do not care if the code after the await, runs on the captured context or not.
In the output console, “True” will be printed since the synchronization context is not kept.
Benchmark
I created a Xamarin Forms application with a Button that when pressed, run the previous methods 1000 times each.
The code is available on GitHub.
private async void ExecuteProcess(object parameter)
{
    try
    {
        // Make sure everything is compiled by doing a cold run
        await ProcessAsync(1);
        await ProcessConfiguredAsync(1);

        // Some values
        const int loop = 1000;
        var sw = new Stopwatch();

        // Tell the user it will take some time
        Message = "Processing...";

        // Start the default process and mesure how long it takes.
        sw.Start();
        await ProcessAsync(loop);
        sw.Stop();

        // Print the duration
        Message = $"ProcessAsync : {sw.ElapsedMilliseconds} ms";

        // Start the configured process and mesure how long it takes.
        sw.Restart();
        await ProcessConfiguredAsync(loop);
        sw.Stop();

        // Print the new duration as well as the old one
        Message = $"{Message}\r\nProcessConfiguredAsync : {sw.ElapsedMilliseconds} ms";
    }
    catch (Exception ex)
    {
        // We are in an async/void method we catch exceptions there.
        Debug.WriteLine(ex);
    }
}
Without further ado, let’s compare the execution speed of both methods in milliseconds.
| Platform | ProcessAsync | ProcessConfiguredAsync |
|---|---|---|
| iOS | 10196 | 10102 |
| Android | 10608 | 10434 |
| UWP | 20029 | 19687 |
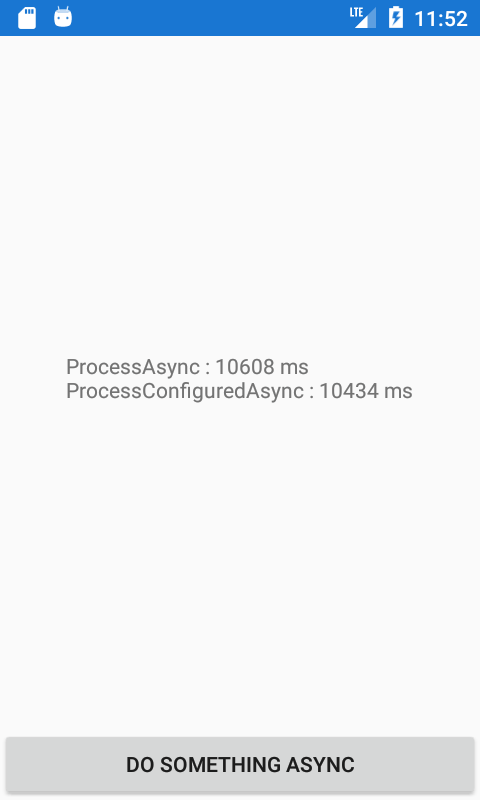
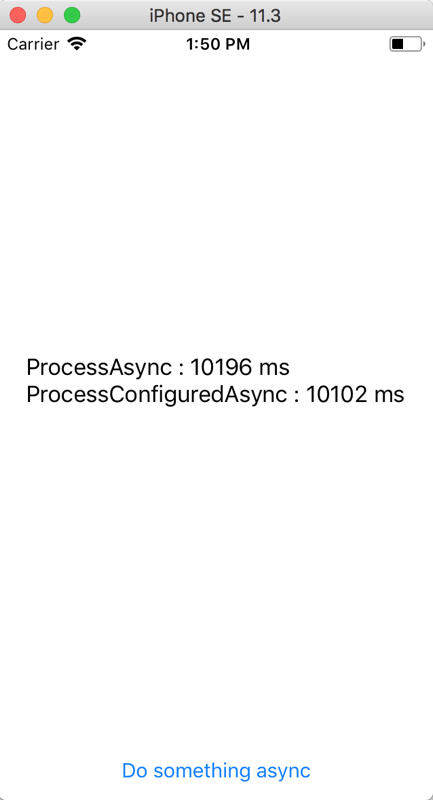
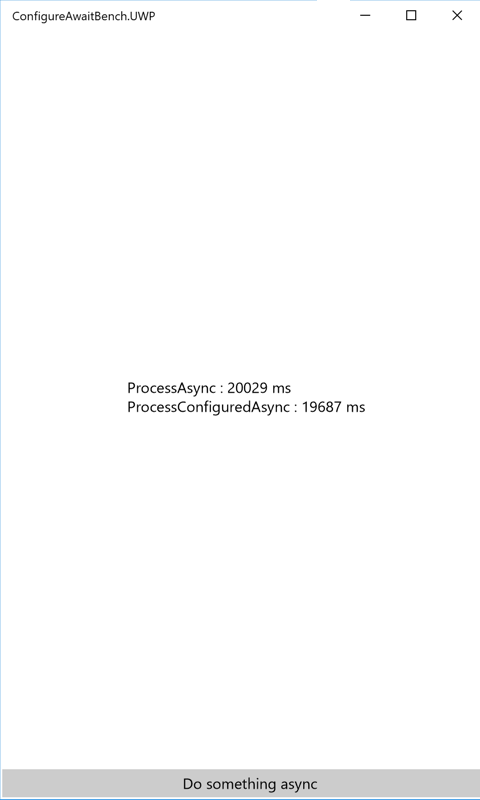
In my set up UWP takes twice a long as iOS and Android, that is because I am on Mac and that Windows runs inside a virtual machine.
Using ConfigureAwait(false) makes this particular method run a bit faster.
I also tried replacing the Task.Delay with a custom Sleep method with similar results and the same conclusion.
private Task Sleep(int millisecondsTimeout)
{
    var taskCompletionSource = new TaskCompletionSource<bool>();

    ThreadPool.QueueUserWorkItem((state) =>
    {
        Thread.Sleep(millisecondsTimeout);
        taskCompletionSource.SetResult(true);
    }, null);

    return taskCompletionSource.Task;
}
Conclusion
As a general rule, every piece of code that is not in a view model and/or that does not need to go back on the main thread should use ConfigureAwait false.
This is simple, easy and can improve the performance of an application by freeing the UI thread for a little longer.
It is not only a matter or performance but also a matter of avoiding potential deadlocks.
There are lots of great posts, articles and videos talking about how async await and ConfigureAwait works. I highly recommend you to take a look at them :
- Asynchronous programming Microsoft Docs
- In depth explanation about async await can be found in the MSDN Magazine
- Six Essential Tips for Async 6th video
As suggested in the comments below by Oliver Münzberg, here is one more intersting blog post about why ConfigureAwait false is for more than performance : Don’t block async code
As always, please feel free to read my previous posts and to comment below, I will be more than happy to answer.
Comments