
Warning : This page has been marked as an archive because the author consider that its content is no longer relevant.
Before starting
In order to have a better understanding of this article, it is recommended to have read the prvious one talking about the creation of commands.
This article will show you different ways to pass parameters to your commands using the nRoute framework.
The context
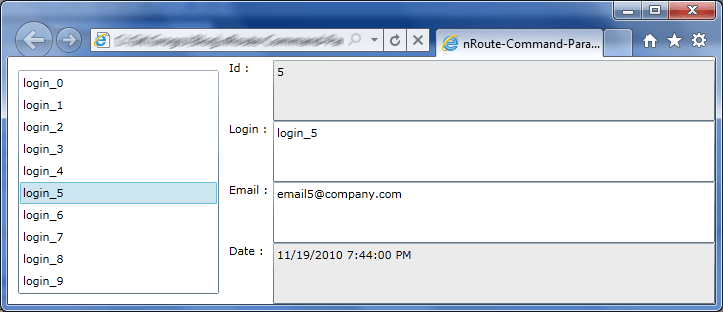
We want to create a simple application which will display a user list. When an item of the list is selected, it will show us the user’s detail on the right.
This application will look like this screenshot:
The data model
Our data model has two classes representing a user.
The first one is UserLight and it only contains the Id and the Login of our user. We will use this class to populate the listbox.
The second one is User and it contains all the informations about our user.
Here’s the code for these classes :
public class UserLight
{
    public long Id { get; set; }
    public string Login { get; set; }
}

public class User
{
    public long Id { get; set; }
    public string Login { get; set; }
    public string Email { get; set; }
    public DateTime CreationDate { get; set; }
}
The data access
In order to facilitate the access to our data, we created a user repository. This repository is a fake one and contains ten users. It uses callbacks to give us our data like would do a repository making asynchronous calls to web services. It contains two methods, the first one giving us the list of all the users and the second one giving us the details about a user.
Here’s the code for the repository :
public class UserRepository
{
    private static readonly List<User> _users;

    static UserRepository()
    {
        _users = new List<User>();

        for (int i = 0; i < 10; ++i)
        {
            _users.Add(new User
            {
                Id = i,
                Login = "login_" + i,
                Email = "email" + i + "@company.com",
                CreationDate = DateTime.Now.AddDays(-i)
            });
        }
    }

    public void GetAll(Action<IEnumerable<UserLight>> callback)
    {
        callback(_users.Select(u => new UserLight { Id = u.Id, Login = u.Login }));
    }

    public void GetById(long userId, Action<User> callback)
    {
        callback(_users.FirstOrDefault(u => u.Id == userId));
    }
}
The view model and the view
Let’s first create our view model. It contains two properties. The first one, Users, stores the list of all the users. The second one, CurrentUser, contains the full information about the selected users in the listbox. The view model will load the list of all the users inside its constructor.
Here is the code of the view model :
[MapViewModel(typeof(MainPage))]
public class MainPageViewModel : ViewModelBase
{
    private readonly UserRepository _userRepository;

    private ObservableCollection<UserLight> _users;
    private User _currentUser;

    public MainPageViewModel()
    {
        _userRepository = new UserRepository();

        _userRepository.GetAll(users => Users = new ObservableCollection<UserLight>(users));
    }

    public ObservableCollection<UserLight> Users
    {
        get
        {
            return _users;
        }

        set
        {
            if (_users != value)
            {
                _users = value;
                NotifyPropertyChanged(() => Users);
            }
        }
    }

    public User CurrentUser
    {
        get
        {
            return _currentUser;
        }

        set
        {
            if (_currentUser != value)
            {
                _currentUser = value;
                NotifyPropertyChanged(() => CurrentUser);
            }
        }
    }
}
And the MainPage’s XAML code :
<UserControl
    x:Class="nRoute_Command_Parameters.Views.MainPage"
    xmlns="http://schemas.microsoft.com/winfx/2006/xaml/presentation"
    xmlns:x="http://schemas.microsoft.com/winfx/2006/xaml"
    xmlns:i="clr-namespace:System.Windows.Interactivity;assembly=System.Windows.Interactivity"
    xmlns:n="http://nRoute/schemas/2010/xaml">

    <i:Interaction.Behaviors>
        <n:BridgeViewModelBehavior />
    </i:Interaction.Behaviors>

    <Grid x:Name="LayoutRoot" Background="White">
        <Grid.ColumnDefinitions>
            <ColumnDefinition Width="1*" />
            <ColumnDefinition Width="Auto" />
            <ColumnDefinition Width="2*" />
        </Grid.ColumnDefinitions>
        <Grid.RowDefinitions>
            <RowDefinition Height="Auto" />
            <RowDefinition Height="Auto" />
            <RowDefinition Height="Auto" />
            <RowDefinition Height="Auto" />
            <RowDefinition Height="Auto" />
        </Grid.RowDefinitions>

        <ListBox x:Name="listBox"
                 Grid.Column="0"
                 Grid.RowSpan="4"
                 ItemsSource="{Binding Users}"
                 DisplayMemberPath="Login"
                 Margin="20"
                 SelectedValuePath="Id">
        </ListBox>

        <TextBlock Grid.Column="1" Grid.Row="0" Text="Id : " />
        <TextBlock Grid.Column="1" Grid.Row="1" Text="Login : " />
        <TextBlock Grid.Column="1" Grid.Row="2" Text="Email : " />
        <TextBlock Grid.Column="1" Grid.Row="3" Text="Date : " />

        <TextBox Grid.Column="2" Grid.Row="0" Text="{Binding CurrentUser.Id}" IsReadOnly="True" />
        <TextBox Grid.Column="2" Grid.Row="1" Text="{Binding CurrentUser.Login}" />
        <TextBox Grid.Column="2" Grid.Row="2" Text="{Binding CurrentUser.Email}" />
        <TextBox Grid.Column="2" Grid.Row="3" Text="{Binding CurrentUser.CreationDate}" IsReadOnly="True" />
    </Grid>
</UserControl>
Declaration and usage of the command
All this is good but when we click of an item of the listbox nothing happens which is pretty normal because we did not code anything for it yet.
So let’s create the command that will be invoked when the selected item changes.
We must now modify our view model and add it the following code:
private ICommand _showDetailCommand;

public ICommand ShowDetailCommand
{
    get
    {
        return _showDetailCommand;
    }
}

private void ShowDetail(long id)
{
    _userRepository.GetById(id, u => CurrentUser = u);
}
Let’s not forget to initialize this command inside of the constructor.
_showDetailCommand = new ActionCommand<long>(ShowDetail);
You’ll notice that we are using the generic version of ActionCommand. By doing this we can indicate that this command that a long parameter and that it must use the ShowDetail method when invoked which will use the repository to get our data and set the CurrentUser property with the result.
Et voilà ! It’s done ! Well almost. We still did not bind our command in the XAML. So let’s do this:
<ListBox x:Name="listBox"
    Grid.Column="0"
    Grid.RowSpan="4"
    ItemsSource="{Binding Users}"
    DisplayMemberPath="Login"
    Margin="20"
    SelectedValuePath="Id">
    <i:Interaction.Triggers>
        <i:EventTrigger EventName="SelectionChanged">
            <n:ExecuteCommandAction
                Command="{Binding ShowDetailCommand}"
                Parameter="{Binding ElementName=listBox, Path=SelectedValue}" />
        </i:EventTrigger>
    </i:Interaction.Triggers>
</ListBox>
If we look carefully at the XAML above we see that:
The selected value of our listbox is the Id property of our UserLight item (SelectedValuePath=”Id”).
We declare a trigger for the SelectionChanged event of the listbox.
And when it triggers, we execute the ShowDetailCommand command of our view model (Command=”{Binding ShowDetailCommand}”) passing it the value selected by the listbox (Parameter=”{Binding ElementName=listBox, Path=SelectedValue}”).
Now it’s really done. If we execute the application you’ll see that everything works as expected.
Congratulations, you now know how to pass a parameter to a command in XAML.
Other ways to achieve this and multiple parameters.
Here’s another way to make the preceding code works that will enable you to learn how to pass multiple parameters to a command.
nRoute provides two couples of classes allowing us to pass multiple parameters:
- n:Parameter / n:ParametersCollection
- n:DependencyParameter / n:DependencyParametersCollection
The Parameter group only accept static values whereas the DependencyParameter group allows binding.
So let’s modify our XAML to use a DependencyParameter:
<n:ExecuteCommandAction Command="{Binding ShowDetailCommand}">
    <n:ExecuteCommandAction.Parameter>
        <n:DependencyParameter Value="{Binding ElementName=listBox, Path=SelectedValue}" />
    </n:ExecuteCommandAction.Parameter>
</n:ExecuteCommandAction>
And the initialization of our command:
_showDetailCommand = new ActionCommand<DependencyParameter>(
    p =>
    {
        var id = System.Convert.ToInt64(p.Value);
        ShowDetail(id);
    });
When executing the application you’ll see that it behaves exactly like before. If we would decide, as an example, to pass both the login and the id of the user to our command we could use the following way: XAML modification:
<n:ExecuteCommandAction Command="{Binding ShowDetailCommand}">
    <n:ExecuteCommandAction.Parameter>
        <n:DependencyParametersCollection>
            <n:DependencyParameter Key="Id" Value="{Binding ElementName=listBox, Path=SelectedValue}" />
            <n:DependencyParameter Key="Login" Value="{Binding ElementName=listBox, Path=SelectedItem.Login}" />
        </n:DependencyParametersCollection>
    </n:ExecuteCommandAction.Parameter>
</n:ExecuteCommandAction>
Command’s initialization modification:
_showDetailCommand = new ActionCommand<DependencyParametersCollection>(
    p =>
    {
        var id = System.Convert.ToInt64(p["Id"]);
        var login = p["Login"].ToString();
        System.Windows.MessageBox.Show(login);
        ShowDetail(id);
    });
I think you understood the principle now ;-)
You’ll find the code for this article on my skydrive.
Comments